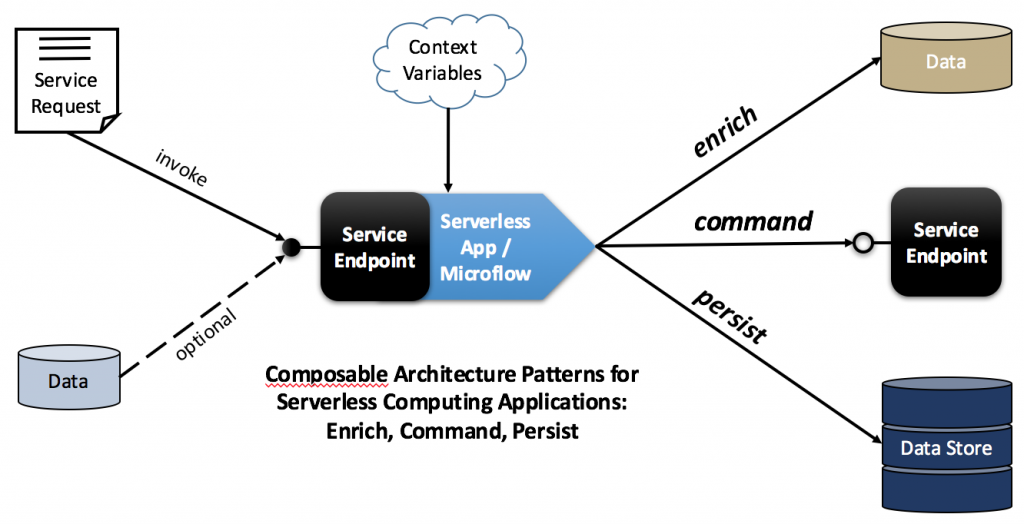
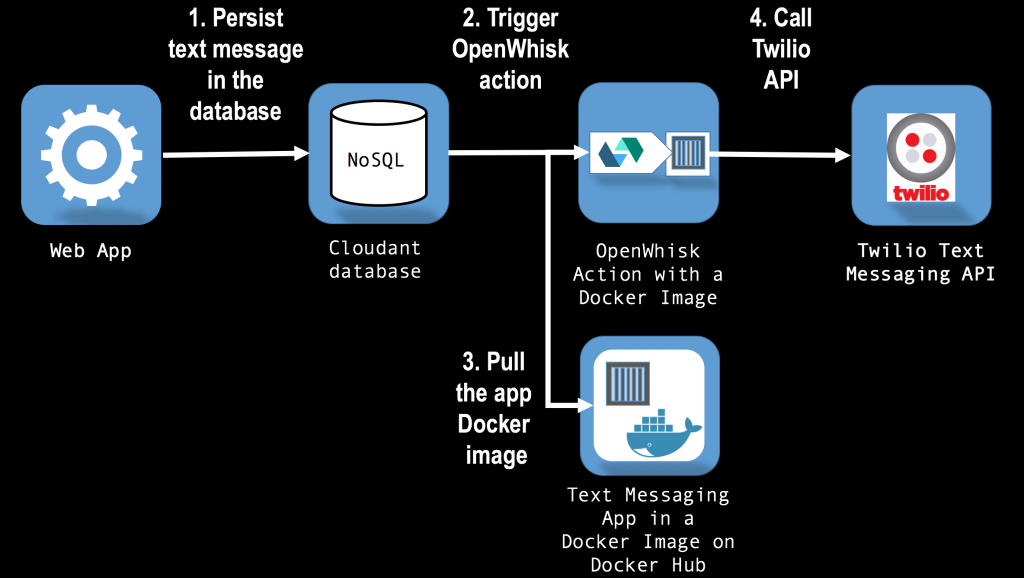
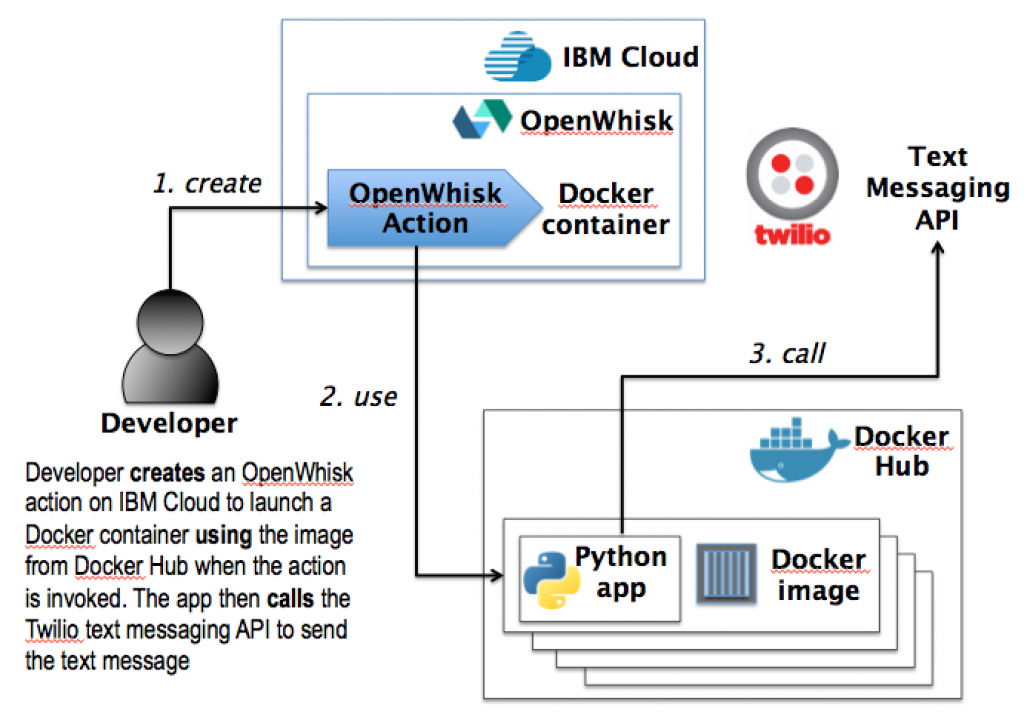
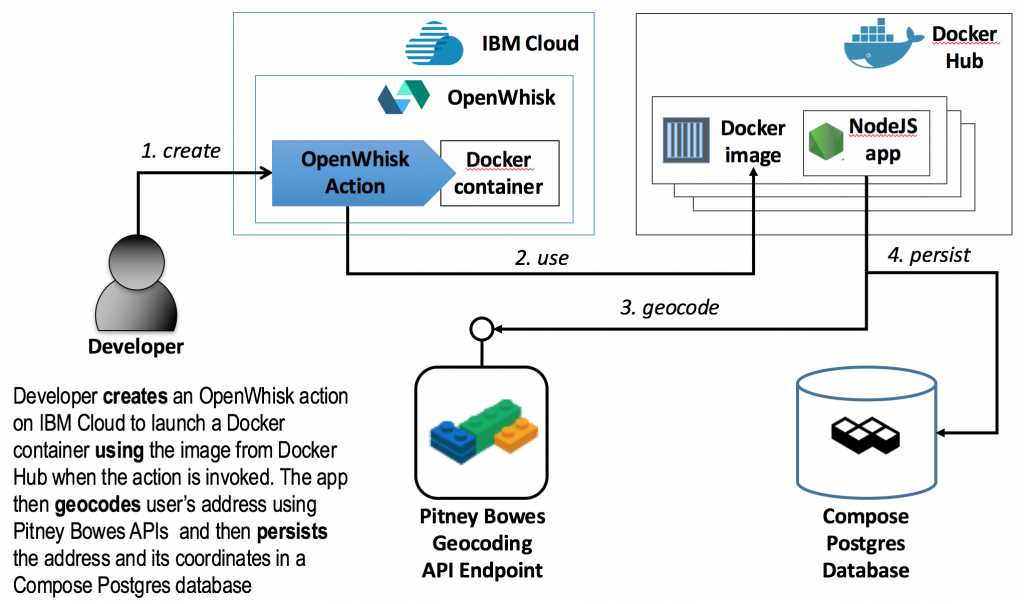
Until recently, platform as a service (PaaS) clouds offered competing approaches on how to implement traditional Extract Transform Load (ETL) style workloads in cloud computing environments. Vendors like IBM, AWS, Google, are starting support serverless computing in their clouds as a way to support ETL and other stateless, task-oriented applications. Building on the examples from Part 1 and Part 2 which described serverless applications for sending text messages, this post demonstrates how an OpenWhisk action can be used to validate unstructured data, add value to the data using 3rd party services / APIs, and to persist the resulting higher value data in an IBM Compose managed database server. The stateless, serverless action executed by OpenWhisk is implemented as a Node.JS app, packaged in a Docker container.
Getting started
To run the code below you will need to sign up for the following services
NOTE: before proceeding, configure the following environment variables from your command line. Use the Docker Hub username for the USERNAME variable and the Pitney Bowes application ID for the PBAPPID variable.
export USERNAME=''
export PBAPPID=''
Create a Postgres database in IBM Compose
When signing up for a Compose trial, make sure that you choose Postgres as your managed database.
Once you are done with the Compose sign up process and your Postgres database deployment is completed, open the deployments tab of the Compose portal and click on the link for your Postgres instance. You may already have a default database called compose in the deployment. To check that this database exists, click on a sub-tab called Browser and verify that there is a link to a database called compose. If the database does not exist, you can create one using a corresponding button on the right.
Next, open the database by clicking on the compose database link and choose the sub-tab named SQL. At the bottom of the SQL textbox add the following CREATE TABLE statement and click the Run button.
CREATE TABLE "address" ("address" "text", "city" "text", "state" "text", "postalCode" "text", "country" "text", "lat" "float", "lon" "float");
The output at the bottom of the screen should contain a “Command executed successfully” response.
You also need to export the connection string for your database as an enviroment variable. Open the Deployments tab, the Overview sub-tab, and copy the entire connection string with the credentials included. You can reveal the credentials by clicking on the Show / Change link next to the password.
Insert the full connection string between the single quotes below and execute the command.
export CONNSTRING=''
NOTE: This connection string will be needed at a later step when configuring your OpenWhisk action.
Create a Cloudant document database in IBM Bluemix
Download a CF command line interface for your operating system using the following link
https://github.com/cloudfoundry/cli/releases
and then install it.
From your command line type in
cf login -a api.ng.bluemix.net
to authenticate with IBM Bluemix and then enter your Bluemix email, password, as well as the deployment organization and space as prompted.
To export your selection of the deployment organization and space as environment variables for the future configuration of the OpenWhisk action:
export ORG=`cf target | grep 'Org:' | awk '{print $2}'`
export SPACE=`cf target | grep 'Space:' | awk '{print $2}'`
To create a new Cloudant database, run the following commands from your console
cf create-service cloudantNoSQLDB Shared cloudant-deployment

cf create-service-key cloudant-deployment cloudant-key

cf service-key cloudant-deployment cloudant-key
The first command creates a new Cloudant deployment in your IBM Bluemix account, the second assigns a set of credentials for your account to the Cloudant deployment. The third command should output a JSON document similar to the following.
{
 "host": "d5695abd-d00e-40ef-1da6-1dc1e1111f63-bluemix.cloudant.com",
 "password": "5555ee55555a555555c8d559e248efce2aa9187612443cb8e0f4a2a07e1f4",
 "port": 443,
 "url": "https://"d5695abd-d00e-40ef-1da6-1dc1e1111f63-bluemix:5555ee55555a555555c8d559e248efce2aa9187612443cb8e0f4a2a07e1f4@d5695abd-d00e-40ef-1da6-1dc1e1111f63-bluemix.cloudant.com",
 "username": "d5695abd-d00e-40ef-1da6-1dc1e1111f63-bluemix"
}
You will need to put these Cloudant credentials in environment variables to create a database and populate the database with documents. Insert the values from the returned JSON document in the corresponding environment variables in the code snippet below.
export USER=''
export PASSWORD=''
export HOST=''
After the environment variables are correctly configured you should be able to create a new Cloudant database by executing the following curl command
curl https://$USER:$PASSWORD@$HOST/address_db -X PUT
On successful creation of a database you should get back a JSON response that looks like this:
{"ok":true}
Clone the OpenWhisk action implementation
The OpenWhisk action is implemented as a Node.JS based application that will be packaged as a Docker image and published to Docker Hub. You can clone the code for the action from github by running the following from your command line
git clone https://github.com/osipov/compose-postgres-openwhisk.git
This will create a compose-postgres-openwhisk folder in your current working directory.
Most of the code behind the action is in the server/service.js file in the functions listed below. As evident from the function names, once the action is triggered with a JSON object containing address data, the process is to first query the Pitney Bowes geolocation data to validate the address and to obtain the latitude and the longitude geolocation coordinates. Next, the process retrieves a connection to the Compose Postgres database, runs a SQL insert statement to put the address along with the coordinates into the database, and returns the connection back to the connection pool.
queryPitneyBowes
connectToCompose
insertIntoCompose
releaseComposeConnection
The code to integrate with the OpenWhisk platform is in the server/app.js file. Once executed, the code starts a server on port 8080 and listens for HTTP POST requests to the server’s _init_ and _run_ endpoints. Each of these endpoints delegates to the corresponding method implementation in server/service.js. The init method simply logs its invocation and returns an HTTP 200 status code as expected by the OpenWhisk platform. The run method executes the process described above to query for geocoordinates and to insert the retrieved data to Compose Postgres.
Build and package the action implementation in a Docker image
If you don’t have Docker installed, it is available per the instructions provided in the link below. Note that if you are using Windows or OSX, you will want to install Docker Toolbox.
https://docs.docker.com/engine/installation/
Make sure that your Docker Hub account is working correctly by trying to login using
docker login -u $USERNAME
You will be prompted and will need to enter your Docker Hub password.
Change to the compose-postgres-openwhisk as your working directory and execute the following commands to build the Docker image with the Node.JS based action implementation and to push the image to Docker Hub.
docker build -t $USERNAME/compose .
docker push $USERNAME/compose
Use your browser to login to https://hub.docker.com after the docker push command is done. You should be able to see the compose image in the list of your Docker Hub images.
Create a stateless, Docker-based OpenWhisk action
To get started with OpenWhisk, download and install a command line interface using the instructions from the following link
https://new-console.ng.bluemix.net/openwhisk/cli
Configure OpenWhisk to use the same Bluemix organization and space as your Cloudant instance by executing the following from your command line
wsk property set --namespace $ORG\_$SPACE
If your $ORG and $SPACE environment variables are not set, refer back to the section on creating a Cloudant database.
Next update the list of packages by executing
wsk package refresh
One of the bindings listed in the output should be named Bluemix_cloudant-deployment_cloudant-key
The following commands need to be executed to configure your OpenWhisk instance to run the action in case if a new document is placed in the Cloudant database.
The first command sets up a Docker-based OpenWhisk action called composeInsertAction that is implemented using the $USERNAME/compose image from Docker Hub.
wsk action create --docker composeInsertAction $USERNAME/compose
wsk action update composeInsertAction --param connString "$CONNSTRING" --param pbAppId "$PBAPPID"
wsk trigger create composeTrigger --feed /$ORG\_$SPACE/Bluemix_cloudant-deployment_cloudant-key/changes --param includeDoc true --param dbname address_db
wsk rule create --enable composeRule composeTrigger composeInsertAction
Test the serverless computing action by creating a document in the Cloudant database
Open a separate console window and execute the following command to monitor the result of running the OpenWhisk action
wsk activation poll
In another console, create a document in Cloudant using the following curl command
curl https://$USER:$PASSWORD@$HOST/address_db -X POST -H "Content-Type: application/json" -d '{"address": "1600 Pennsylvania Ave", "city": "Washington", "state": "DC", "postalCode": "20006", "country": "USA"}'
On success you should see in the console running the wsk activation poll a response similar to following
[run] 200 status code result
{
  "command": "SELECT",
  "rowCount": 1,
  "oid": null,
  "rows": [
    {
      "address": "1600 Pennsylvania Ave",
      "city": "Washington",
      "state": "DC",
      "postalcode": "20006",
      "country": "USA",
      "lat": 38.8968999990778,
      "lon": -77.0408
    }
  ],
  "fields": [
    {
      "name": "address",
      "tableID": 16415,
      "columnID": 1,
      "dataTypeID": 25,
      "dataTypeSize": -1,
      "dataTypeModifier": -1,
      "format": "text"
    },
    {
      "name": "city",
      "tableID": 16415,
      "columnID": 2,
      "dataTypeID": 25,
      "dataTypeSize": -1,
      "dataTypeModifier": -1,
      "format": "text"
    },
    {
      "name": "state",
      "tableID": 16415,
      "columnID": 3,
      "dataTypeID": 25,
      "dataTypeSize": -1,
      "dataTypeModifier": -1,
      "format": "text"
    },
    {
      "name": "postalcode",
      "tableID": 16415,
      "columnID": 4,
      "dataTypeID": 25,
      "dataTypeSize": -1,
      "dataTypeModifier": -1,
      "format": "text"
    },
    {
      "name": "country",
      "tableID": 16415,
      "columnID": 5,
      "dataTypeID": 25,
      "dataTypeSize": -1,
      "dataTypeModifier": -1,
      "format": "text"
    },
    {
      "name": "lat",
      "tableID": 16415,
      "columnID": 6,
      "dataTypeID": 701,
      "dataTypeSize": 8,
      "dataTypeModifier": -1,
      "format": "text"
    },
    {
      "name": "lon",
      "tableID": 16415,
      "columnID": 7,
      "dataTypeID": 701,
      "dataTypeSize": 8,
      "dataTypeModifier": -1,
      "format": "text"
    }
  ],
  "_parsers": [
    null,
    null,
    null,
    null,
    null,
    null,
    null
  ],
  "rowAsArray": false
}

