This post is a Part 2 in a series on serverless computing. The last post described how to build a simple but useful text messaging application written in Python, packaged in a Docker image on Docker Hub, and launched using the OpenWhisk serverless computing framework. The app was implemented to be entirely stateless, which is common in serverless computing but can be limiting for many practical use cases.
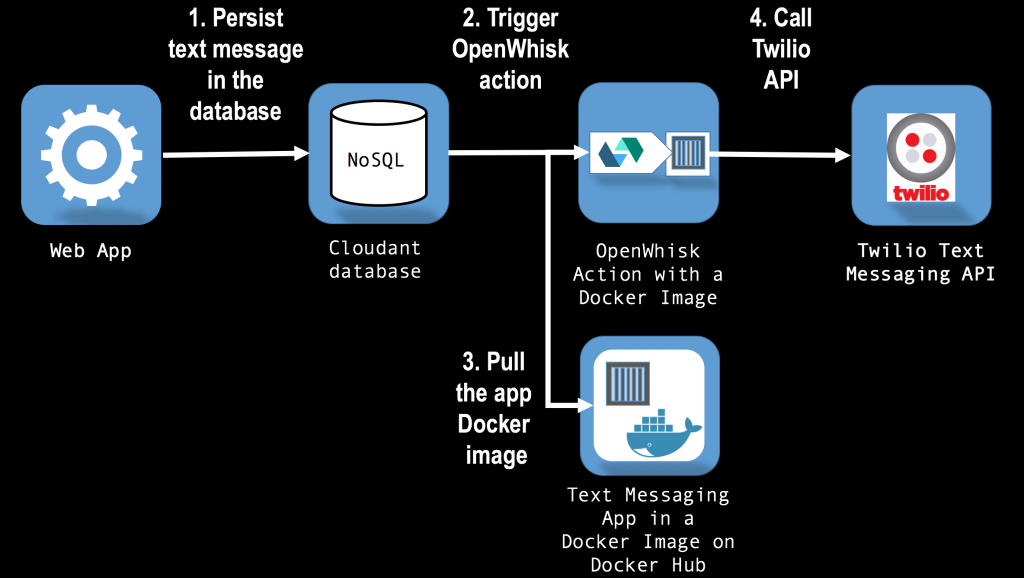
For example, applications that send text messages may need to make a record about the text message contents, the date and time when the message was sent, and other useful state information. This post will describe how to extend the application built in Part 1 to persist the text message metadata in Cloudant, a PouchDB based JSON document database available from IBM Bluemix. Since OpenWhisk integrates with Cloudant, it is possible to setup OpenWhisk to automatically trigger a Docker-based action to send the SMS once the text message contents are in Cloudant. An overview of the process is described in the following diagram.
Before you start
Make sure that you have completed the steps in the Part 1 of the series and have a working textAction in OpenWhisk that can send text messages using Twilio. You will also need to make sure you are registered for IBM Bluemix. To sign up for a 30 day trial Bluemix account register here: https://console.ng.bluemix.net/registration/
Next, download a Cloud Foundry command line interface for your operating system using the following link
https://github.com/cloudfoundry/cli/releases
and then install it.
Create a Cloudant deployment in IBM Bluemix
In your console, type in
cf login -a api.ng.bluemix.net
to authenticate with IBM Bluemix and then enter your Bluemix email, password, as well as the deployment organization and space as prompted.
To export your selection of the deployment organization and space as environment variables for configuration of the OpenWhisk action:
export ORG=`cf target | grep 'Org:' | awk '{print $2}'`

export SPACE=`cf target | grep 'Space:' | awk '{print $2}'`
To create a new Cloudant database, run the following commands from your console
cf create-service cloudantNoSQLDB Shared cloudant-deployment
cf create-service-key cloudant-deployment cloudant-key
cf service-key cloudant-deployment cloudant-key
The first command creates a new Cloudant deployment in your IBM Bluemix account, the second assigns a set of credentials for your account to the Cloudant deployment. The third command should output a JSON document similar to the following.
{

"host": "d5555abd-d00e-40ef-1da6-1dc1e1111f63-bluemix.cloudant.com",

"password": "5555ee55555a555555c8d559e248efce2aa9187612443cb8e0f4a2a07e1f4",

"port": 443,

"url": "https://"d5695abd-d00e-40ef-1da6-1dc1e1111f63-bluemix:5555ee55555a555555c8d559e248efce2aa9187612443cb8e0f4a2a07e1f4@d5695abd-d00e-40ef-1da6-1dc1e1111f63-bluemix.cloudant.com",

"username": "d5695abd-d00e-40ef-1da6-1dc1e1111f63-bluemix"

}
You will need to put these Cloudant credentials in environment variables to create a database and populate the database with documents. Insert the values from the returned JSON document in the corresponding environment variables in the code snippet below.
export USER=''

export PASSWORD=''

export HOST=''
After the environment variables are correctly configured you should be able to create a new Cloudant database by executing the following curl command
curl https://$USER:$PASSWORD@$HOST/sms -X PUT
On successful creation of a database you should get back a JSON response that looks like this:
{"ok":true}
Integrate Cloudant with OpenWhisk rules and triggers
Configure OpenWhisk to use the same Bluemix organization and space as your Cloudant instance by executing the following from your command line
wsk property set --namespace $ORG\_$SPACE
If your $ORG and $SPACE environment variables are not set, refer back to the section on creating the Cloudant database.
Next update the list of packages by executing
wsk package refresh
One of the bindings listed in the output should be named Bluemix_cloudant-deployment_cloudant-key
Run following commands to configure OpenWhisk to start the action in case if a new document is placed in the Cloudant sms database.
wsk trigger create textTrigger --feed /$ORG\_$SPACE/Bluemix_cloudant-deployment_cloudant-key/changes --param includeDoc true --param dbname sms
wsk rule create –enable textRule textTrigger textAction
The first command creates a trigger that listens to changes to the Cloudant database. The second command is a rule that indicates that whenever the trigger is activated with a document in Cloudant, then the text messaging action (textAction created in the previous post) needs to be invoked.
Test the OpenWhisk trigger by logging the text message to the Cloudant database
Open a separate console window and execute the following command to monitor the OpenWhisk log
wsk activation poll
In another console, create a document in Cloudant using the following curl command, replacing the to value to specify the phone number and the msg value to specify the text message contents:
curl https://$USER:$PASSWORD@$HOST/sms -X POST -H "Content-Type: application/json" -d '{"from": "$TWILIO_NUMBER", "to": "867-5309", "msg":"Jenny I got your number"}'
On success, you should see in the console running the wsk activation poll a response similar to following
{
    "status": [
        {
            "success": "true"
        },
        {
            "message_sid": "SM5ecc4ee8c73b4ec29e79c0f1ede5a4c8"
        }
    ]
}
